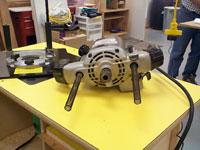
Ryobi RE600 Springs
These instructions are strictly the opinions of the author and should not refer or reflect those of the manufacturer. Always refer to your owner's manual for exploded views of your router and if you don't feel comfortable with these directions do not remove your springs.
Removing The RE600 Micro Adjustment Knob
Step 1: With your router in the upright position you first must remove the micro adjustment knob. Turn the knob until it comes completely off. Under the knob is a spring, a nut and a washer.


Removing The Ryobi RE600 Sub-Base
Step 2: With the router on itís back and the lock mechanism face down, press your body against the base plate, and your hands on the router, pull the lock mechanism. The base will press against you and will start to slide off.

Step 3: When there is no pressure against you, grab the base and pull it off. The threaded rod runs through the body also, so make sure that you have pulled the base off far enough to remove the rod also. The springs will be hanging from the router.

Removing The RE600 Springs
Step 4: Begin pulling the springs out of the body and as you pull, bend them down a bit. This will grab the plastic tube inside the spring.

Replacing The RE600 Base
Step 5: Slide the base back into the router body. The easiest way to do this with this router is in the upright position.

Release the lock handle and then slide the router body over the column. Make sure that the threaded rod slides through the top of the body housing.
Reassemble The RE600
Step 6: Now replace the washer, nut and spring back on in the same order that they were removed.

Slide the micro adjustment knob back over the threaded shaft. As you are doing this, press down on the spring. This will tension the knob so that it will rotate easier. Make sure that the know seats into the hex nut housing in the bottom of the knob handle.
